

Production time: 3 - 5 Days
White ink allows to print on dark papers up to 12 x 18 in size.
Papers to print on: from 20# text to 120# cover suitable for laser.
Keep in mind: White ink is not fully opaque, so large letters and numbers may show some of the original paper color underneath.
White ink printing will allow you to use a big range of colored and dark papers. However, there are a few things you should keep in mind when designing for white ink.
Your screen vs the print. If you aren't used to, this is a weird one to work with, because what you see on the screen is not how it is going to print, I’ll explain.
White ink only prints white, so all of your design has to be setup for 1 color only. During your design process, you’re welcome to use the color of the paper and white text for you to see how the final result will look like, but when you’re getting ready to send us the files, these need to have no colored backgrounds, and all text set to 100% K. You can set percentages of black if you want to create an opacity effect.
1. Setup your bleed:
Bleed area is the extra (usually 1/8″) of color beyond the finished size of your printed piece. It allows us to print your piece oversized and cut it down to size, thereby giving the appearance that the printing bleeds off the edge of the page, rather than having white borders. Because cutting may vary slightly, it is a good idea to make sure all of your valuable information (ie. text) is within the “safe design zone” (at least 1/8″ inside the finished area.)
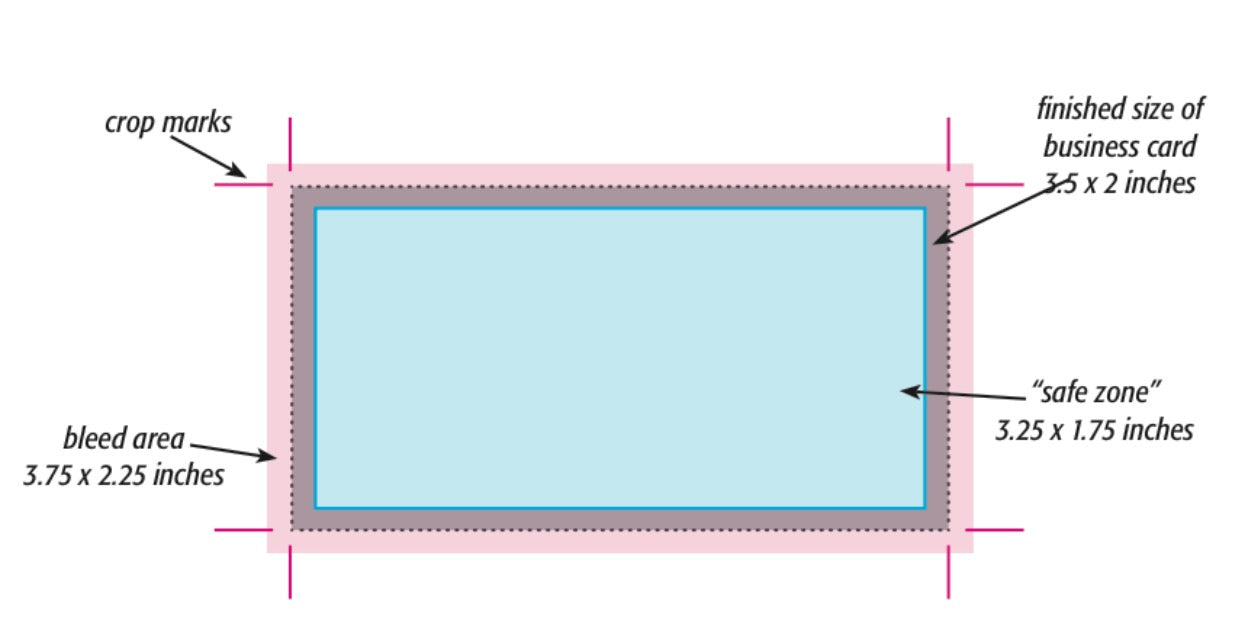
For example, a standard business card measures 3.5 x 2 inches. When creating your design file, create the page size equal to the printed size of your piece (3.5 x 2). Extend any color that you want to bleed off the page at least .125 inches past your page size. Make sure to save the file as a .PDF with bleeds. Make sure to save the files as a high-resolution PDF with bleeds. Crop marks are not necessary.
2. Outline fonts
While either in Adobe Illustrator or InDesign, select all your text that needs to be outlined using the black arrow tool (the default arrow tool). Next, select TYPE>Create Outlines. This will automatically convert your text into vector shapes. Your text will temporarily look bolder and be highlighted in blue. Click anywhere on your artboard that is white to deselect your text and its appearance will look normal again.
3. Save your file as the High Quality Print Adobe PDF preset, make sure the bleeds are checked.
In stock papers for digital printing:
The darker the better, to print in white ink we prefer uncoated colored stock, to see the full list and request swatches, visit the paper guide.
Other printed methods that can be combined with digital printing:
CMYK ink - For medium-light colored paper.
Foil Print - For smooth paper
Foil Stamp - All paper
Embossing - Blind embossing in all dark paper
This website allows you to place an order for your custom prints, you’re able to process your order for the most common print sizes, as well as our stocked papers. Begin your online order |
CUSTOM DESIGN AND PRINT QUOTEIF YOU ARE READY TO WORK ON YOUR EVENT STATIONERY AND NEED DESIGN AND PRINTING, WE’RE HAPPY TO WORK WITH YOU AND CREATE A CUSTOM QUOTE. Request a print-only quote |
|---|