

Production time: 7 - 9 Days
The oldest method of printing, printed color-by-color and leaving an impression on the paper. Print up to 11 x 17 in size.
Papers to print on: from 20# text to 365# cover, best if textured or with cotton content.
Keep in mind: A die is required, so it needs a longer turn around time. It does not allow for variable data. Each color requires a different setup, so prices can be higher.
Letterpress will allow you to achieve an amazing pillowy impression on paper.
Your design has to be setup per inking color. During your design process, you’re welcome to use the color of the paper and color of the ink color you want for your text for you to see how the final result will look like, but when you’re getting ready to send us the files, these need to have no colored backgrounds, and all text set to 100% K. A different layer per color.
Make sure the lines are at least .35 pt thick.
No type smaller than 6 points. Letterpress excels at printing type and handles most fonts very well. Still, don’t use type smaller than 6 point. Outline your fonts when submitting your files.
Number of inks: letterpress printing traditionally uses 1 or 2 spot colors. The cost increases with each additional ink. 3 or 4 spot colors make for an extravagant and lavish production, though it sure is pretty if you have the budget.
Custom colors: we have several colors we stock. If you have a special color need we are able to mix any PMS color in the uncoated book, let us know if you need help finding this color.
Screens are best suited for offset printing. Letterpress excels at printing colors at 100%. If you’d like to incorporate a lighter color, use a second lighter ink color instead of a screen.
Dies and scores: letterpress printing presses can die cut and score paper—even very thick stocks. If you’re creating a custom die pattern, send it over (via email or yousendit.com) and we’ll make sure that it works well on our equipment.
Letterpress on envelopes: in general, letterpress can print envelopes well. We can print on the flap and also on the front of the envelopes. See our envelope templates for the exact printable areas.
Use font size of 12 point or larger for reverse type: if your reverses are too small, your reverses can clog up on a letterpress. That’s why we recommend a 12 point or larger font size for reverse type, though this does vary depending on the typeface that you use. You may have to add a small stroke to the reverse type to compensate for letterpress ink gain. Also, if we’re printing text and the solid area around your reverse type in the same color, we may need to print the solid area in a separate print run. Extra press runs increaes the cost of printing.
Light ink on dark paper: with letterpress, we tend to print dark ink on light paper because that is letterpress printing’s strength! Light ink on dark paper is really best suited for engraving or foil stamping. When a letterpress client wants to incorporate a darker color, we might suggest printing an offset flood on the back side of a light colored paper, or duplexing a dark colored paper to a light colored paper. That said, if you really want to letterpress light ink on dark paper, just be prepared for paper show through. Our letterpress inks are translucent. Printing light ink on dark paper will be like using a thin coat of white paint on a brown wall: you’ll see the brown color through the paint (think chalkboard for the final look). If using a pure white ink or metallic ink, we can run a piece through the press twice, at an additional cost, to create a denser color.
Large solids (areas larger than ½” thick) and paper show through: letterpress printed solids look somewhat different from offset printed solids. With letterpress, the paper tends to show through large solids, creating a slightly textured look that’s almost suede-like (we think this is a beautiful look by the way). If you have a large solid and thin text in the same color, we’ll need to print the solid in a separate press run, to give the text a good deep impression and proper inking. Extra press runs increase the cost of printing. Large solid areas can cause buckling of the paper, especially if using a thinner machine-made paper stock. You’ll also notice the depth of impression may appear less noticeable on really large letterpress solids.
Talk to us if your piece is larger than 9 x 12: depending on the nature of the artwork and the quantity we’re printing, we can recommend a format that works well for our equipment as well as your budget.
Because there are always exceptions to rules, our pre-press staff reviews all artwork prior to platemaking.
1. Setup your bleed:
Bleed area is the extra (usually 1/8″) of color beyond the finished size of your printed piece. It allows us to print your piece oversized and cut it down to size, thereby giving the appearance that the printing bleeds off the edge of the page, rather than having white borders. Because cutting may vary slightly, it is a good idea to make sure all of your valuable information (ie. text) is within the “safe design zone” (at least 1/8″ inside the finished area.)
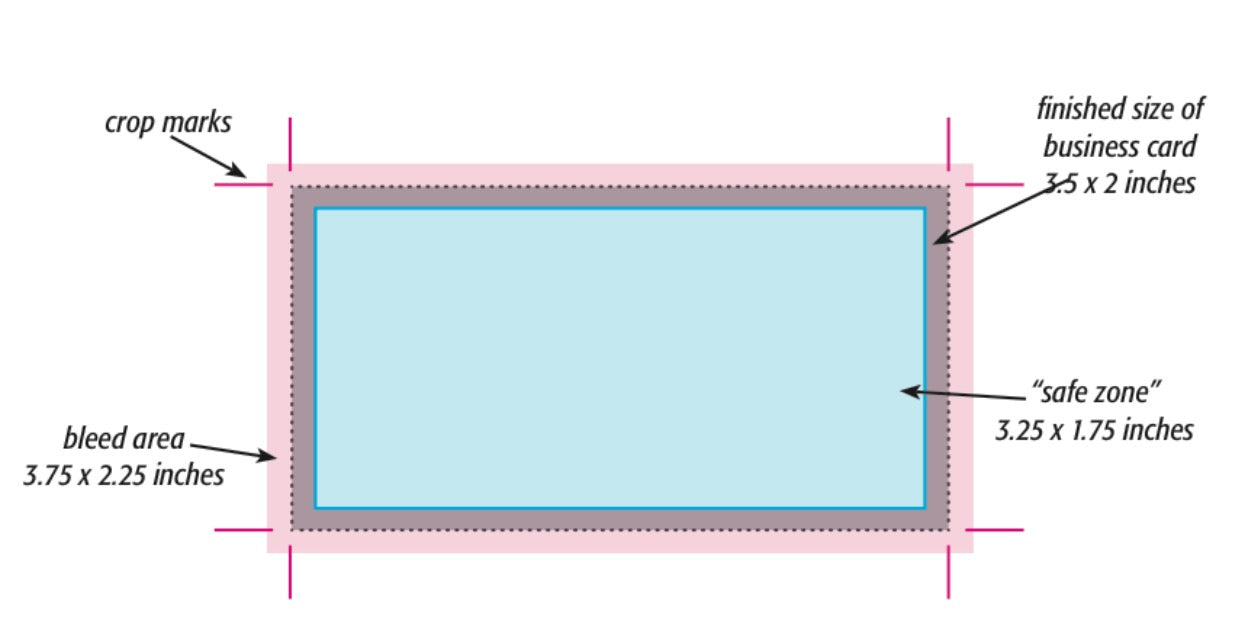
For example, a standard business card measures 3.5 x 2 inches. When creating your design file, create the page size equal to the printed size of your piece (3.5 x 2). Extend any color that you want to bleed off the page at least .125 inches past your page size. Make sure to save the file as a .PDF with bleeds. Make sure to save the files as a high-resolution PDF with bleeds. Crop marks are not necessary.
2. Outline fonts:
While either in Adobe Illustrator or InDesign, select all your text that needs to be outlined using the black arrow tool (the default arrow tool). Next, select TYPE>Create Outlines. This will automatically convert your text into vector shapes. Your text will temporarily look bolder and be highlighted in blue. Click anywhere on your artboard that is white to deselect your text and its appearance will look normal again.
In stock papers for letterpress printing:
TBD
Other printed methods that can be combined with digital printing:
CMYK ink - Textured or Cotton paper is best
Embossing - Blind embossing on Textured or Cotton
Foil Stamp - Texturedpaper is best
This website allows you to place an order for your custom prints, you’re able to process your order for the most common print sizes, as well as our stocked papers. Begin your online order |
CUSTOM DESIGN AND PRINT QUOTEIF YOU ARE READY TO WORK ON YOUR EVENT STATIONERY AND NEED DESIGN AND PRINTING, WE’RE HAPPY TO WORK WITH YOU AND CREATE A CUSTOM QUOTE. Request a print-only quote |
|---|