

Production time: 7 - 9 Days
Foil stamp allows foils stick to certain parts of the paper through the use of a metal die, commonly leaving an impression on the paper. Foiled area up to 8 x 10.
Papers to print on: from 20# text to 365# cover.
Keep in mind: A die is required, so it needs a longer turn around time. It does not allow for variable data. Higher quality than foil print. Large areas of foil are not recommended.
Foil Stamp will allow you to achieve a lux look, that can be demonstrated in almost any kind of paper.
Your design has to be setup for 1 color only. During your design process, you’re welcome to use the color of the paper and color of the foil you want for your text for you to see how the final result will look like, but when you’re getting ready to send us the files, these need to have no colored backgrounds, and all text set to 100% K.
Make sure the lines are at least .35 pt thick.
Print quality:
Artwork suitable for letterpress printing generally prints well in foil stamping. We’ve done extensive testing with our foil dies to maximize our printing quality, and the type of foil that we use creates beautiful images with a clean release. A few differences to note from letterpress though: many of our foils are completely opaque with no show-through of paper; art and type tends to look thicker or bolder in foil stamping, especially on thicker papers; and thin reverses tend to fill in more on foil stamping.
Foil envelopes look beautiful with foil stamping. We can print on the back flap (as long as the image is contained in the designated print area on our envelope templates) and on the front of the envelopes. We cannot print foil bleeds on envelopes. See our envelope templates for printable areas.
Edge painting and bleeds: if your foil-stamped design has a bleed greater than 1/8″ wide, we won’t be able to use edge painting or foil edging. If you want to use these embellishments, keep a 1/8″ foil-free margin around all sides of the piece.
Double-sided printing (with foil stamping on both sides): in many situations, we’re able to foil stamp on both sides of a card, but this does depend on the paper and the amount of coverage in the artwork. If you’re printing on a 1-ply paper (under 30 pt.), have us review artwork beforehand so we can see if double-sided foil stamping is possible for your job. 2-ply stock (over 30 pt.) will generally work, though we’ll need to minimize the impression depth on both sides. Heavy coverage on the double-sided printing, such as all-over back patterning in foil, is not possible without duplexing.
Double-sided printing, foil over letterpress: we can generally print foil stamping on one side and letterpress on the opposite side. When the artwork on one side backs up the artwork on the opposite side, we will minimize the impression depth.
Foil colors on dark stock: foil stamping is opaque, which makes a light foil over a dark paper possible.
Custom foil colors: new foil colors outside of the foils we stock require extensive testing on our various papers, so we generally don’t offer custom colors. If you have a special color need though, let us know and we’ll see what we can do.
Minimum font size: 8 pt for stamping and 9 pt for printing.
Font weight, fine scripts, and thin fonts: typefaces generally appear a little bolder when foil stamped or printed. Thin fonts can be used, but if the font has very intricate lines, our prepress staff may need to add a small stroke to the type. We prefer that our prepress staff handle this correction.
Don’t track or kern too tightly. A good rule of thumb: set type loosely and with more leading than you might ordinarily consider.
Heavy coverage + intricate details: it’s difficult to print areas of large foil coverage and areas of small intricate details in the same run (and still achieve high quality results). When a piece uses both heavy coverage and light coverage in the same color, we may need to create two dies and run those dies in separate passes, increasing the cost.
Solid areas: we don’t recommend foil stamping of completely solid areas (100% coverage) that are more than 6 square inches.
Fine lines and detail: we utilize a plate making process that allows superior results for designs that include fine lines and details. However, there are times where very fine intricate detail may be lost. Thin details work about the same as letterpress printing, except that reverses or thin spaces between artwork tend to fill in. Be sure the space between the lines in the design is no less than half the thickness of the stock that you are using. For example, if you’re using Crane’s Lettra 1-ply (21 points thick), you should have 10.5 pts minimum between lines in your design.
Because there is always exceptions to rules, our pre-press staff review all artwork prior to platemaking.
1. Setup your bleed:
Bleed area is the extra (usually 1/8″) of color beyond the finished size of your printed piece. It allows us to print your piece oversized and cut it down to size, thereby giving the appearance that the printing bleeds off the edge of the page, rather than having white borders. Because cutting may vary slightly, it is a good idea to make sure all of your valuable information (ie. text) is within the “safe design zone” (at least 1/8″ inside the finished area.)
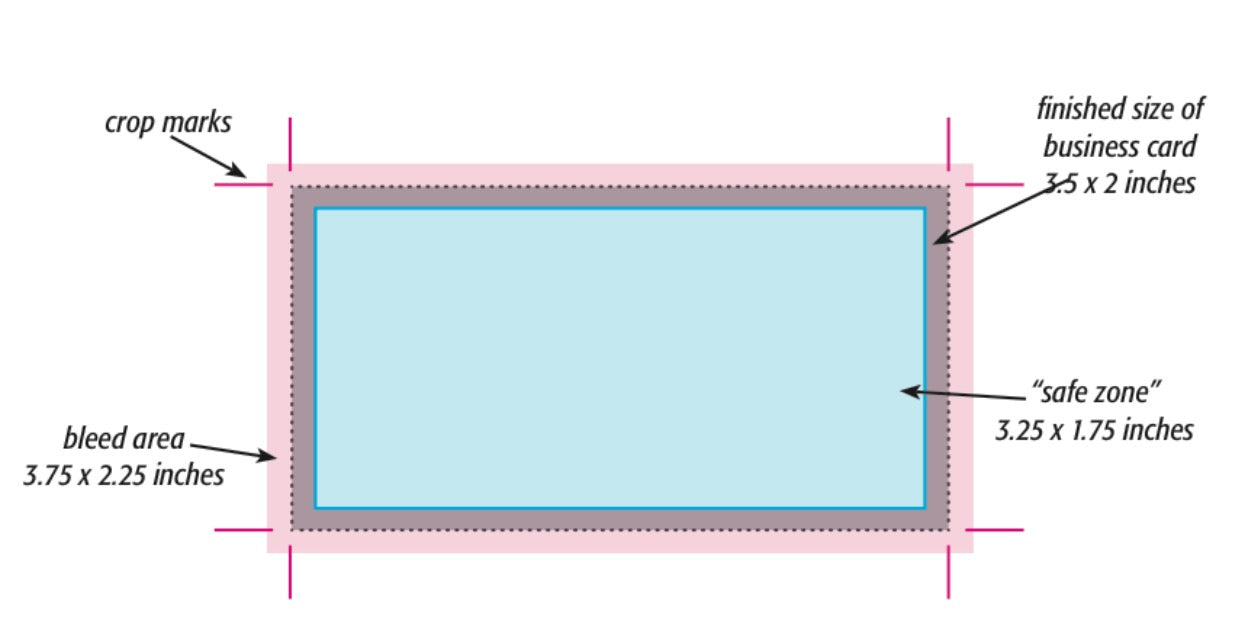
For example, a standard business card measures 3.5 x 2 inches. When creating your design file, create the page size equal to the printed size of your piece (3.5 x 2). Extend any color that you want to bleed off the page at least .125 inches past your page size. Make sure to save the file as a .PDF with bleeds. Make sure to save the files as a high-resolution PDF with bleeds. Crop marks are not necessary.
2. Outline fonts:
While either in Adobe Illustrator or InDesign, select all your text that needs to be outlined using the black arrow tool (the default arrow tool). Next, select TYPE>Create Outlines. This will automatically convert your text into vector shapes. Your text will temporarily look bolder and be highlighted in blue. Click anywhere on your artboard that is white to deselect your text and its appearance will look normal again.
3. Save your file as the High Quality Print Adobe PDF preset, make sure the bleeds are checked.
In stock papers for digital printing:
TBD
Other printed methods that can be combined with digital printing:
CMYK ink - Any papers
White ink - Any paper
Letterpress - Textured or cotton
Embossing - Blind embossing on any paper
This website allows you to place an order for your custom prints, you’re able to process your order for the most common print sizes, as well as our stocked papers. Begin your online order |
CUSTOM DESIGN AND PRINT QUOTEIF YOU ARE READY TO WORK ON YOUR EVENT STATIONERY AND NEED DESIGN AND PRINTING, WE’RE HAPPY TO WORK WITH YOU AND CREATE A CUSTOM QUOTE. Request a print-only quote |
|---|